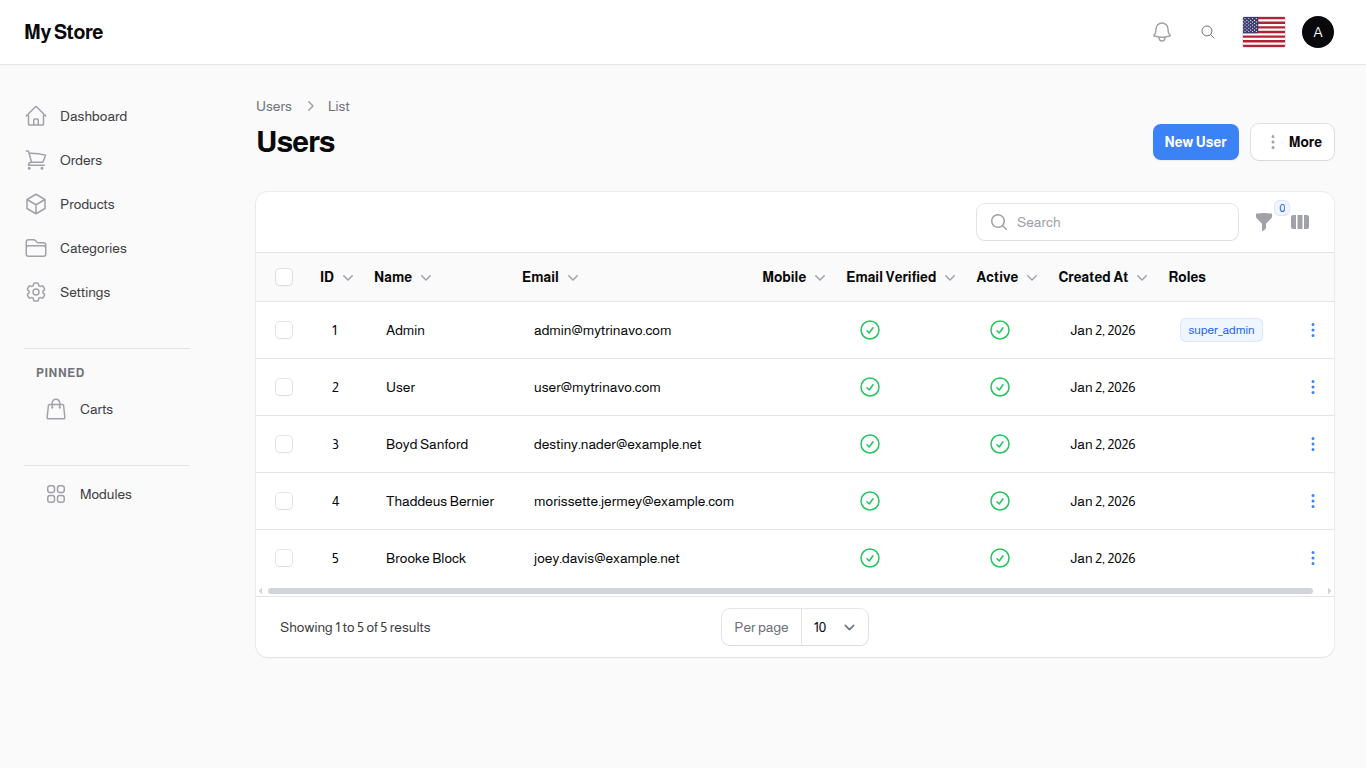
Users
Manage all user accounts on your platform including customers, vendors, and administrators. Control access, roles, and user information.
Overview
Users section allows you to:
- Create and manage accounts for customers, vendors, staff
- Assign roles and permissions
- Update user information and contact details
- Manage loyalty points and levels
- Configure cart settings per user
- Manage user addresses
- Reset passwords and manage access
- Track user activity and status
- Suspend or activate accounts
Accessing Users
Click Modules → User Management → Users
Understanding Users
User Types
- Customer: Regular shoppers on your platform
- Vendor: Sellers/suppliers (can have assigned categories to restrict where they sell)
- Administrator: Staff with management access (can have assigned categories to restrict what they see)
- Support Staff: Customer service team
User Fields
- Name: Full name (required)
- Email: Contact email (unique)
- Mobile: Contact phone number
- Date of Birth: User's birth date
- Gender: Male or Female
- Password: Account password
- Active: Account status toggle
- Email Verified: Email verification status
- Telegram Chat ID: For Telegram notifications
- Roles: Job function/permissions
Form Tabs
The user form is organized into 5 tabs for easier management:
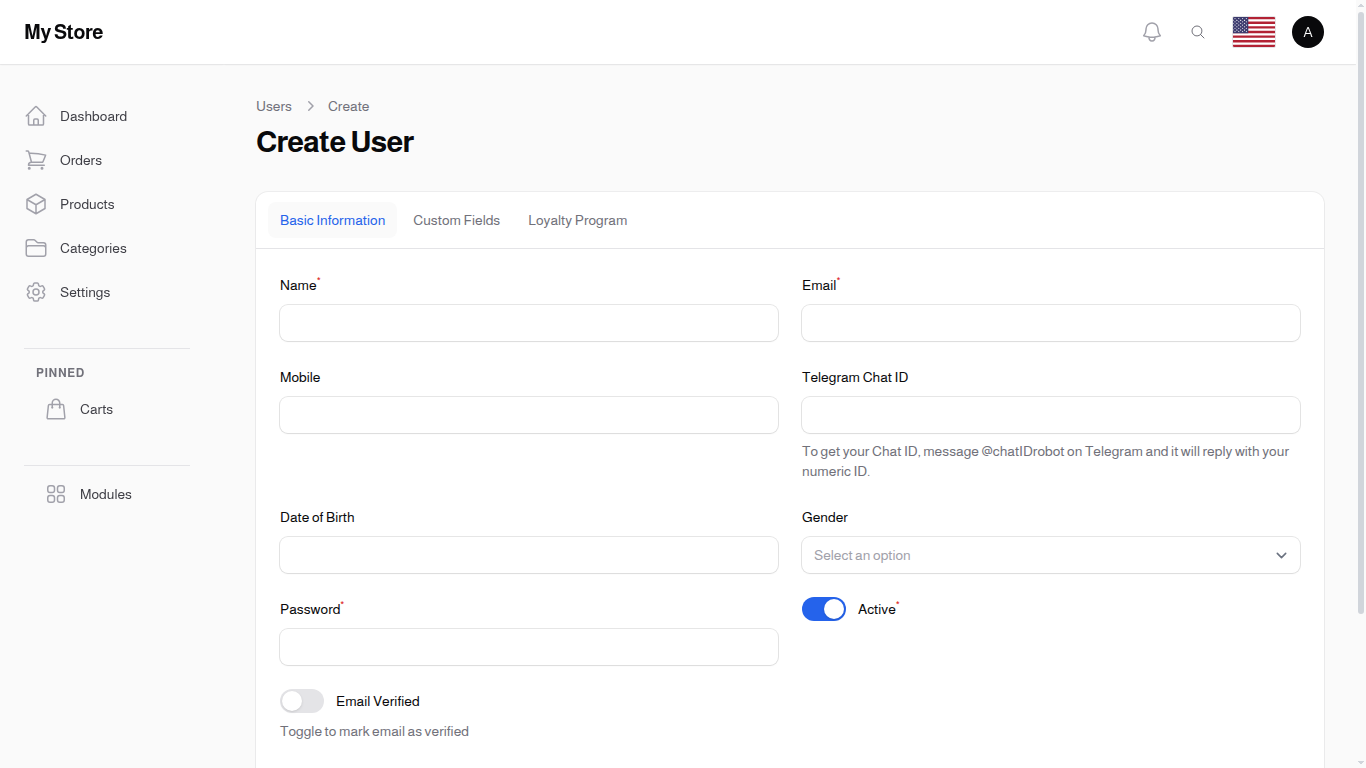
Basic Information Tab
Contains core user profile fields:
- Name (required)
- Mobile
- Date of Birth
- Gender
- Password (required for new users)
- Active toggle
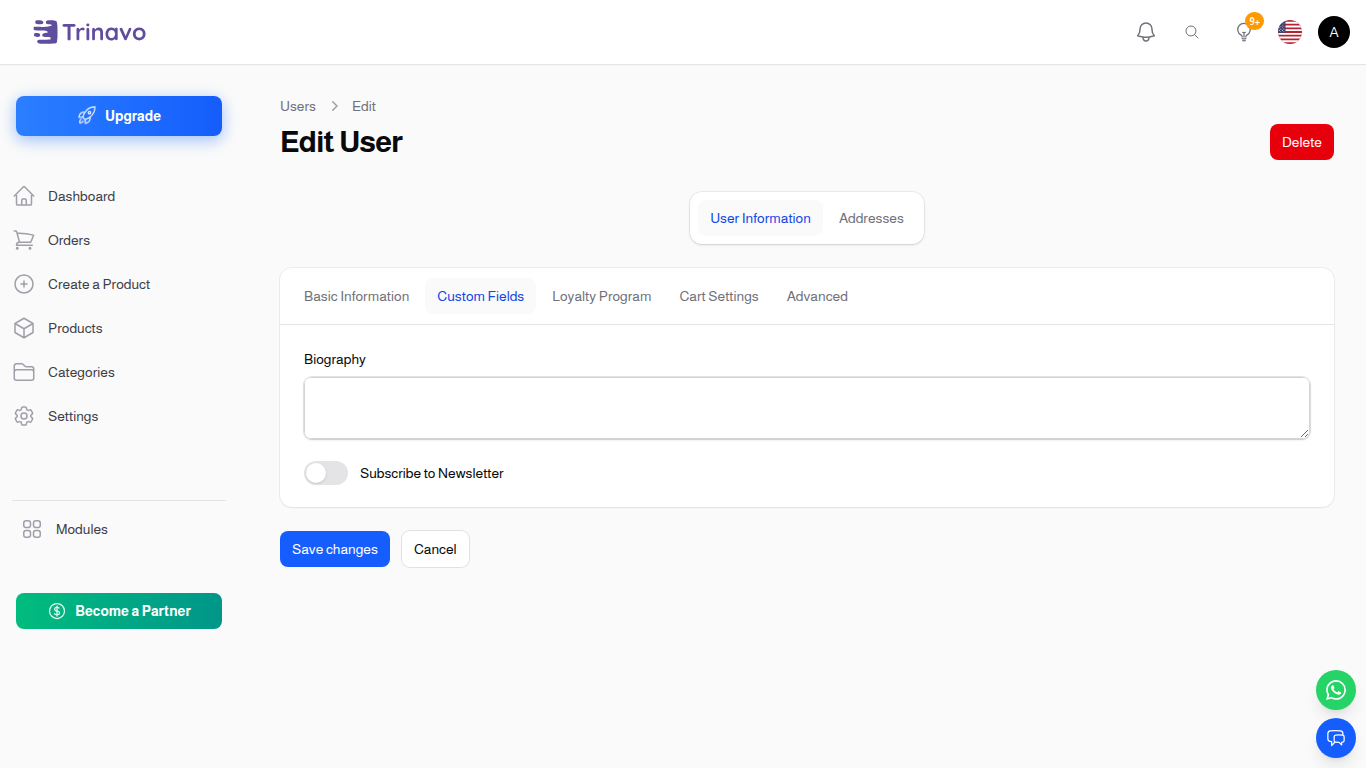
Custom Fields Tab
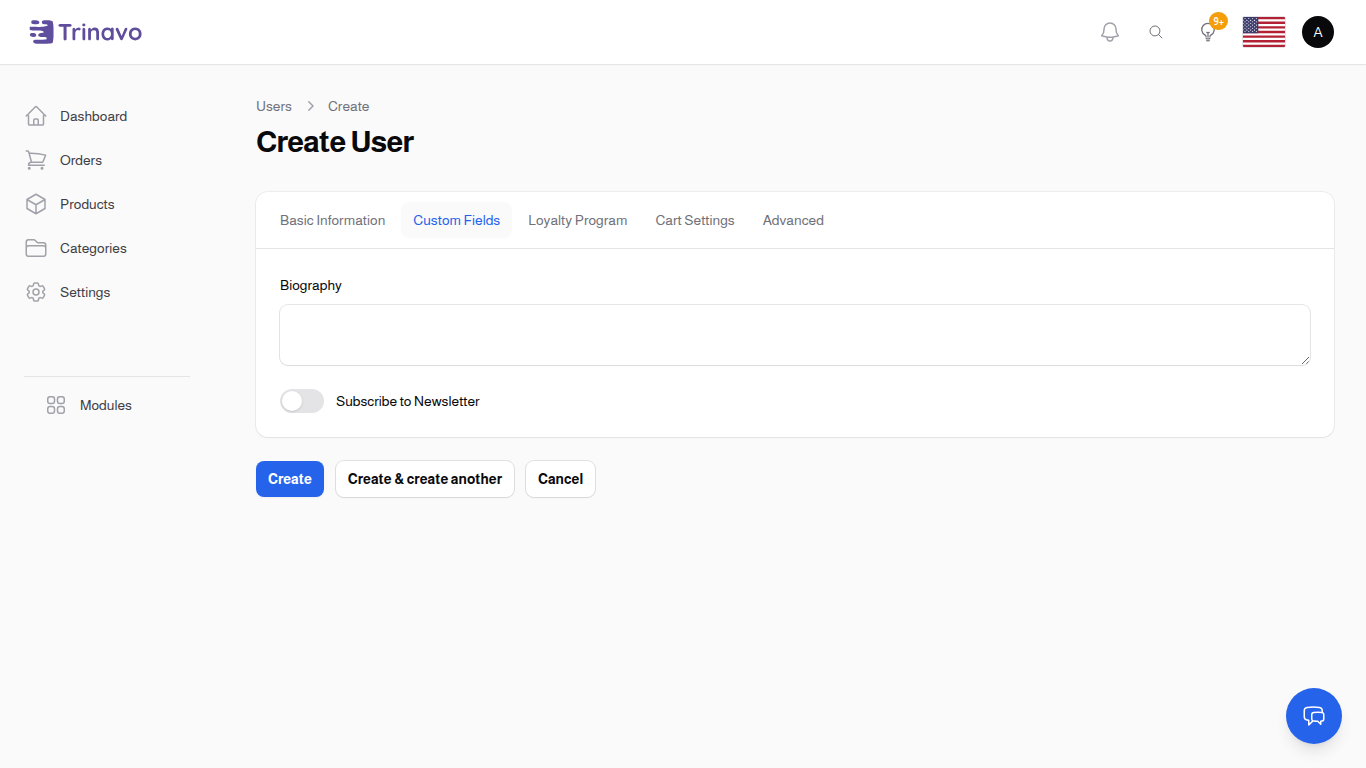
Displays any custom fields configured in User Custom Fields. These fields are dynamic and may include:
- Text fields
- Textarea fields
- File uploads
- Dropdown selections
- Boolean toggles
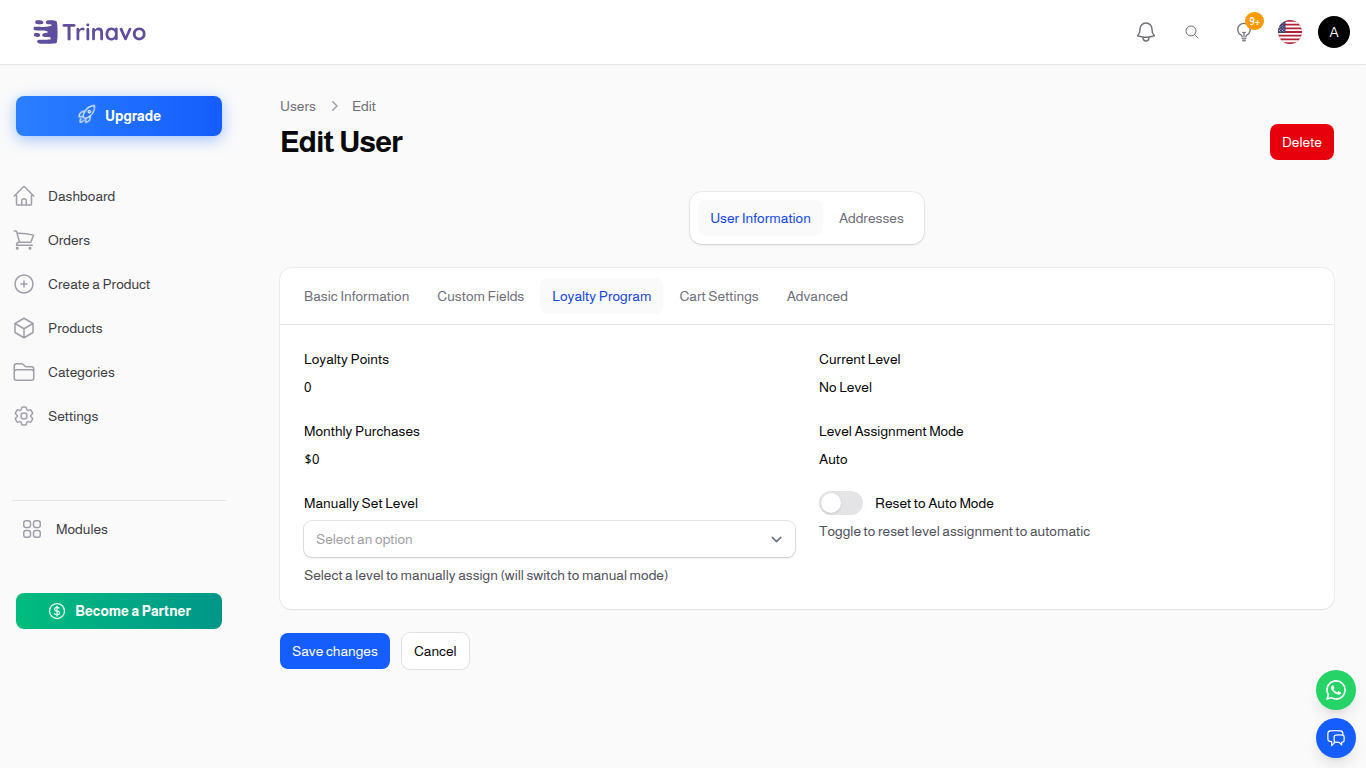
Loyalty Program Tab
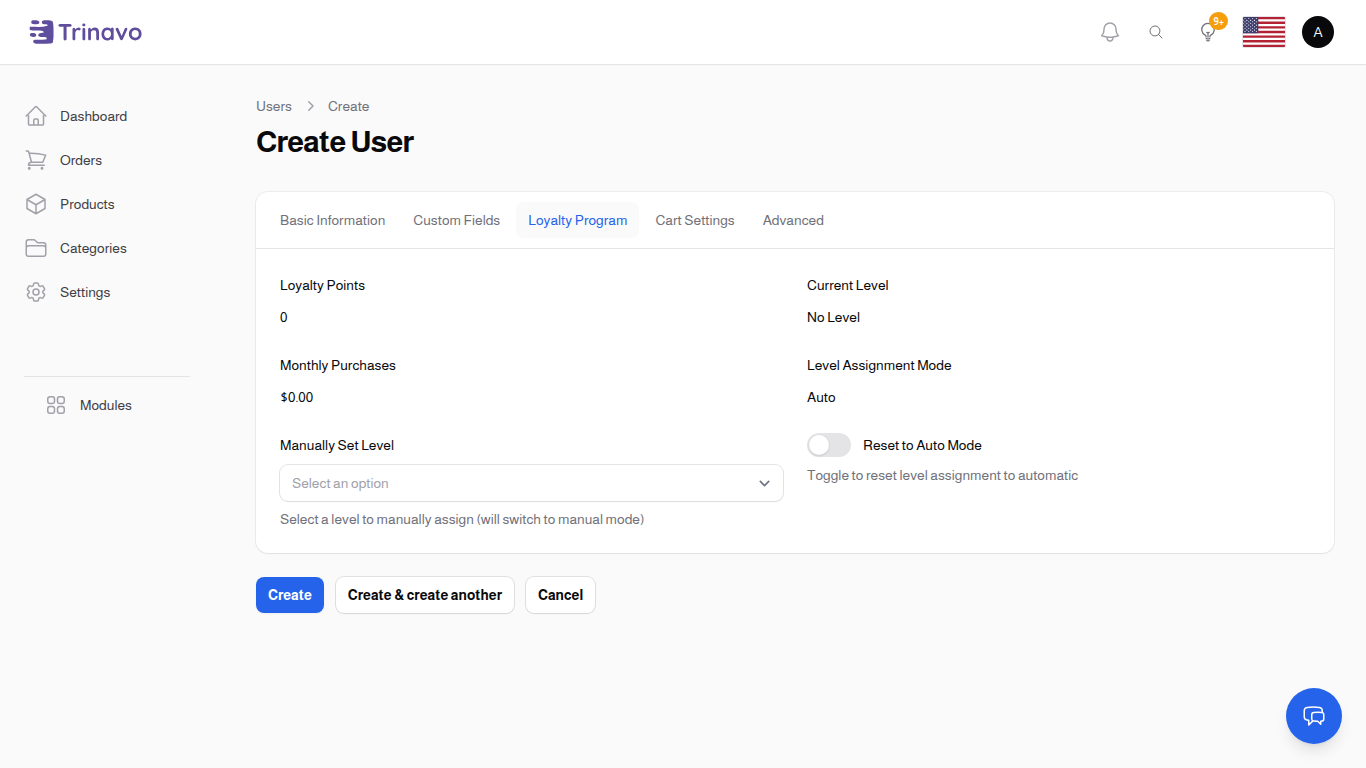
Manage user loyalty information:
- Loyalty Points: Current points balance (read-only)
- Current Level: User's loyalty level (read-only)
- Monthly Purchases: Total purchases this month (read-only)
- Level Assignment Mode: Auto or Manual
- Manually Set Level: Override automatic level assignment
- Reset to Auto Mode: Return to automatic level calculation
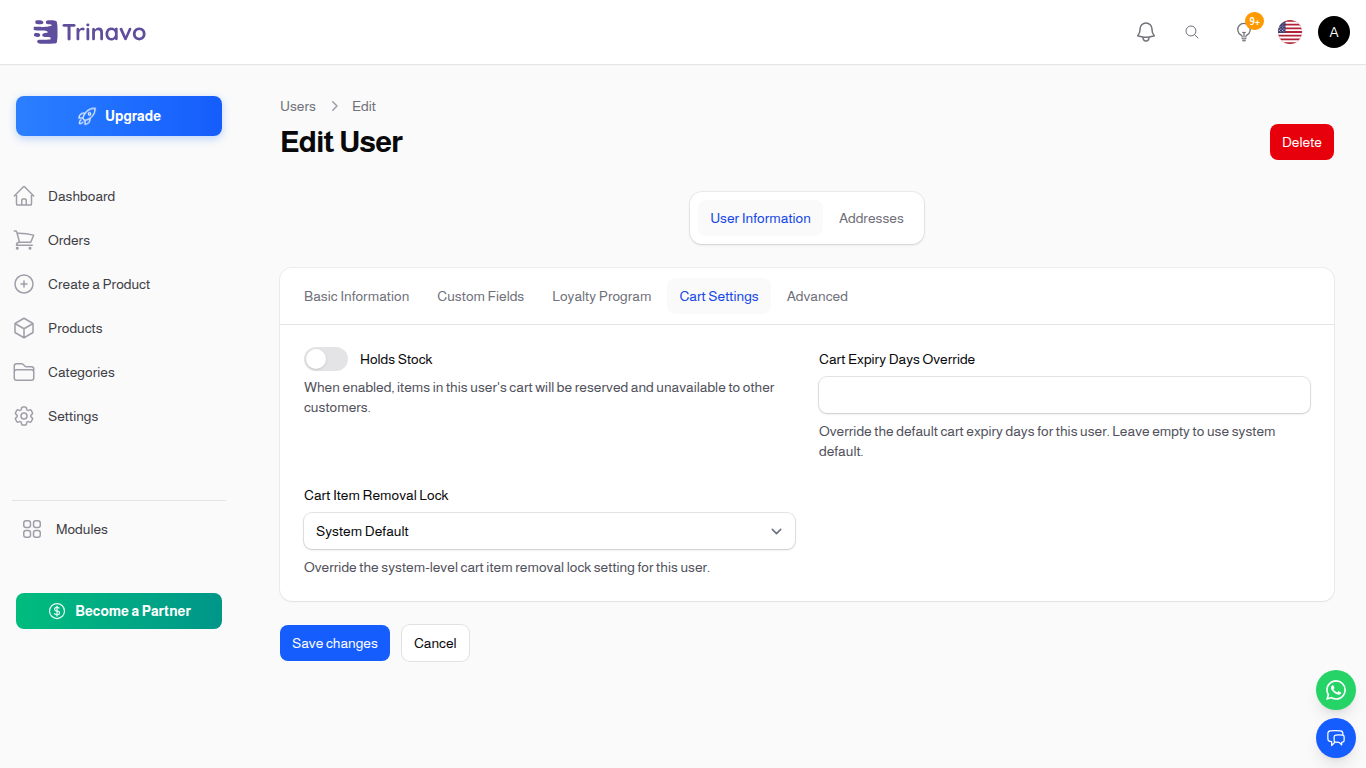
Cart Settings Tab
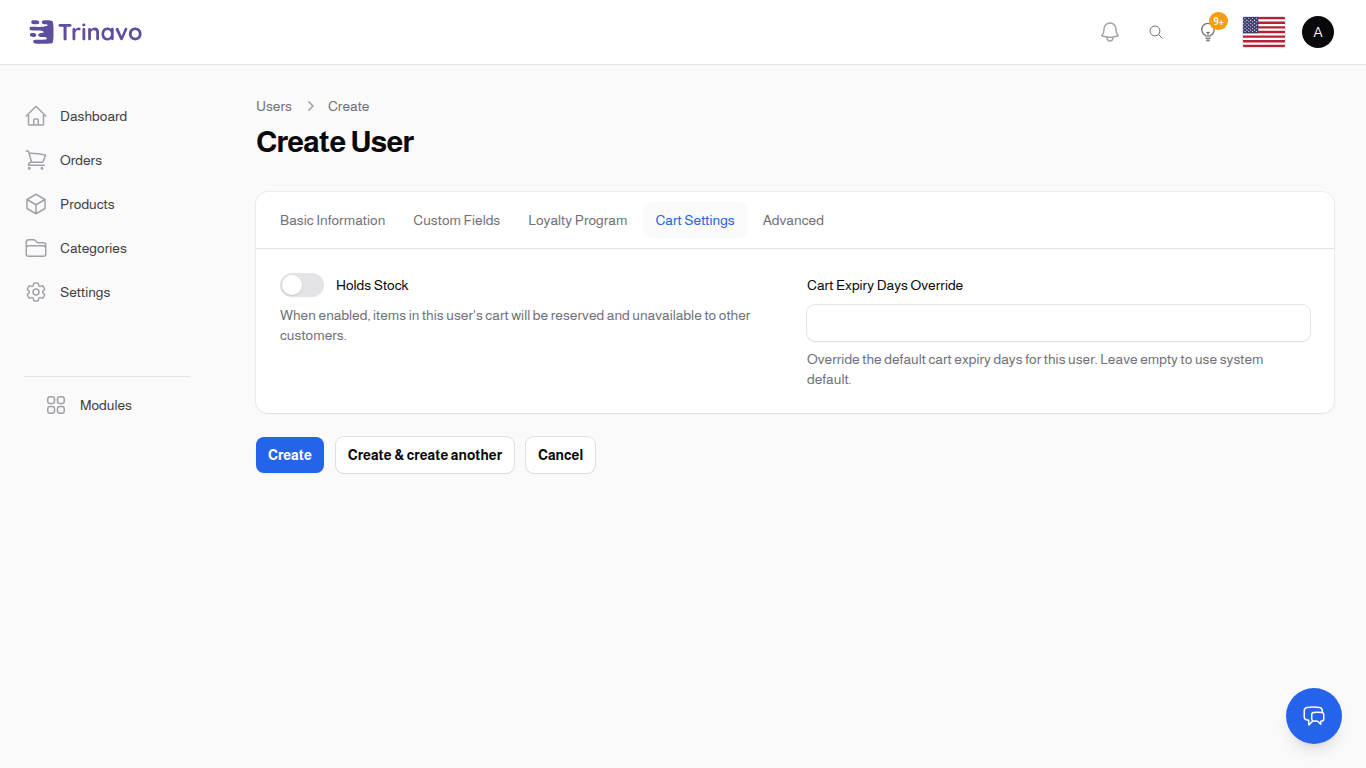
Configure user-specific cart behavior:
- Holds Stock: When enabled, items in this user's cart will be reserved and unavailable to other customers
- Cart Expiry Days Override: Override the default cart expiry days for this user (leave empty for system default)
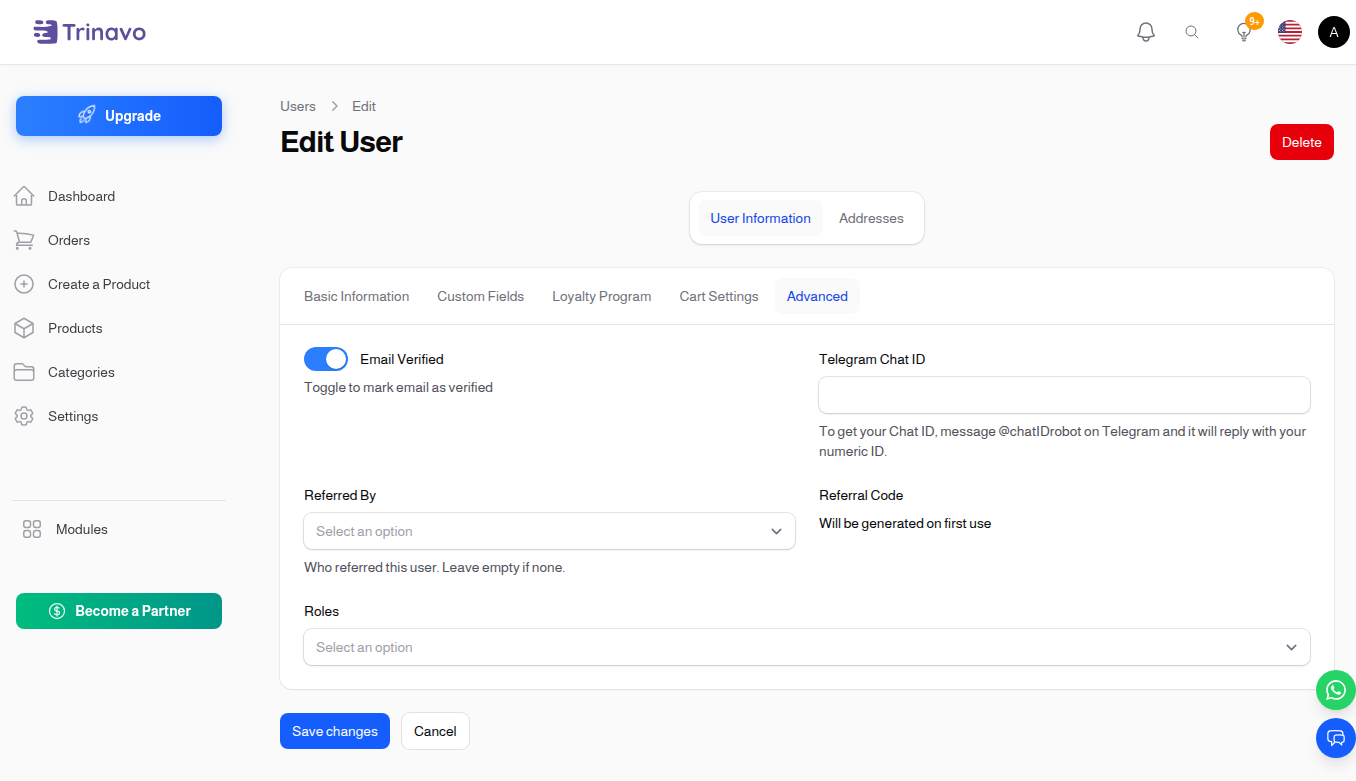
Advanced Tab
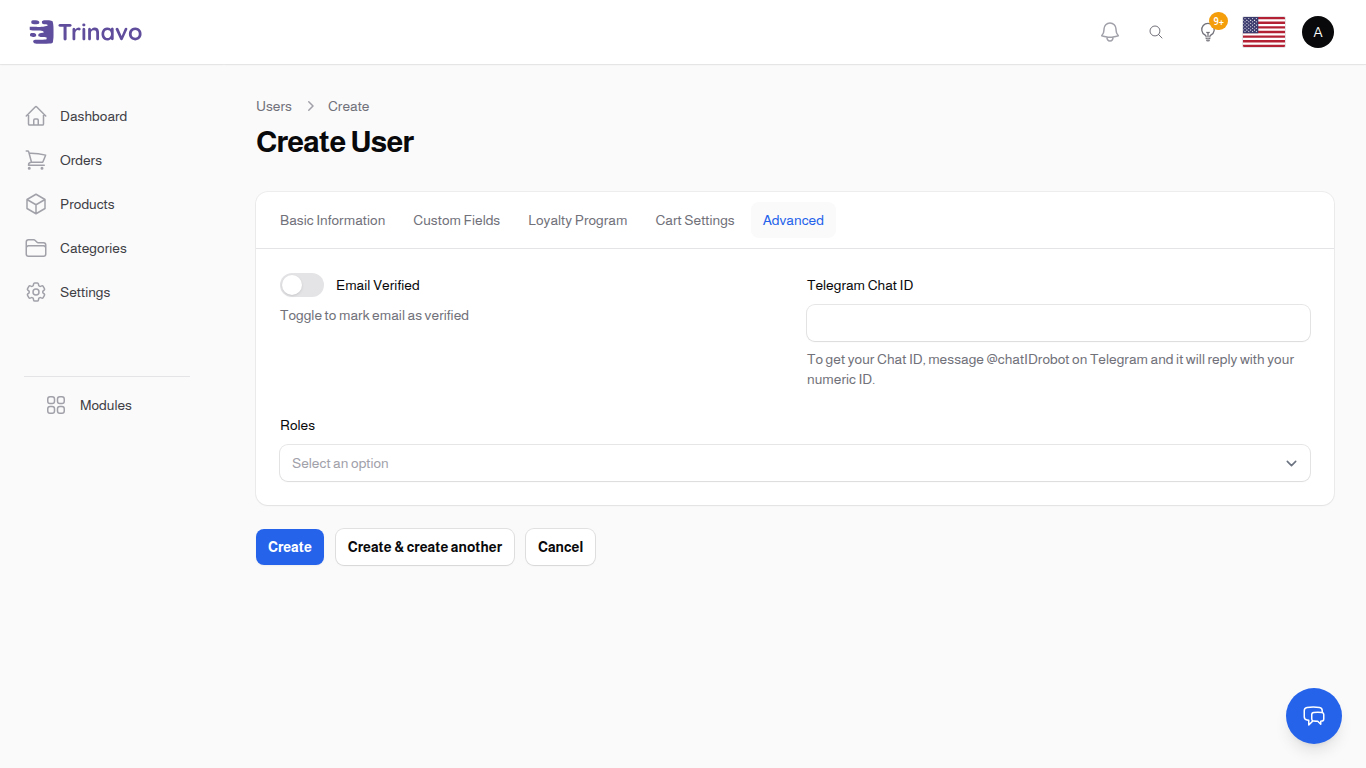
Advanced user settings:
- Email Verified: Toggle to manually mark email as verified
- Telegram Chat ID: Enter user's Telegram Chat ID for notifications (get it by messaging @chatIDrobot on Telegram)
- Roles: Assign one or more roles to the user
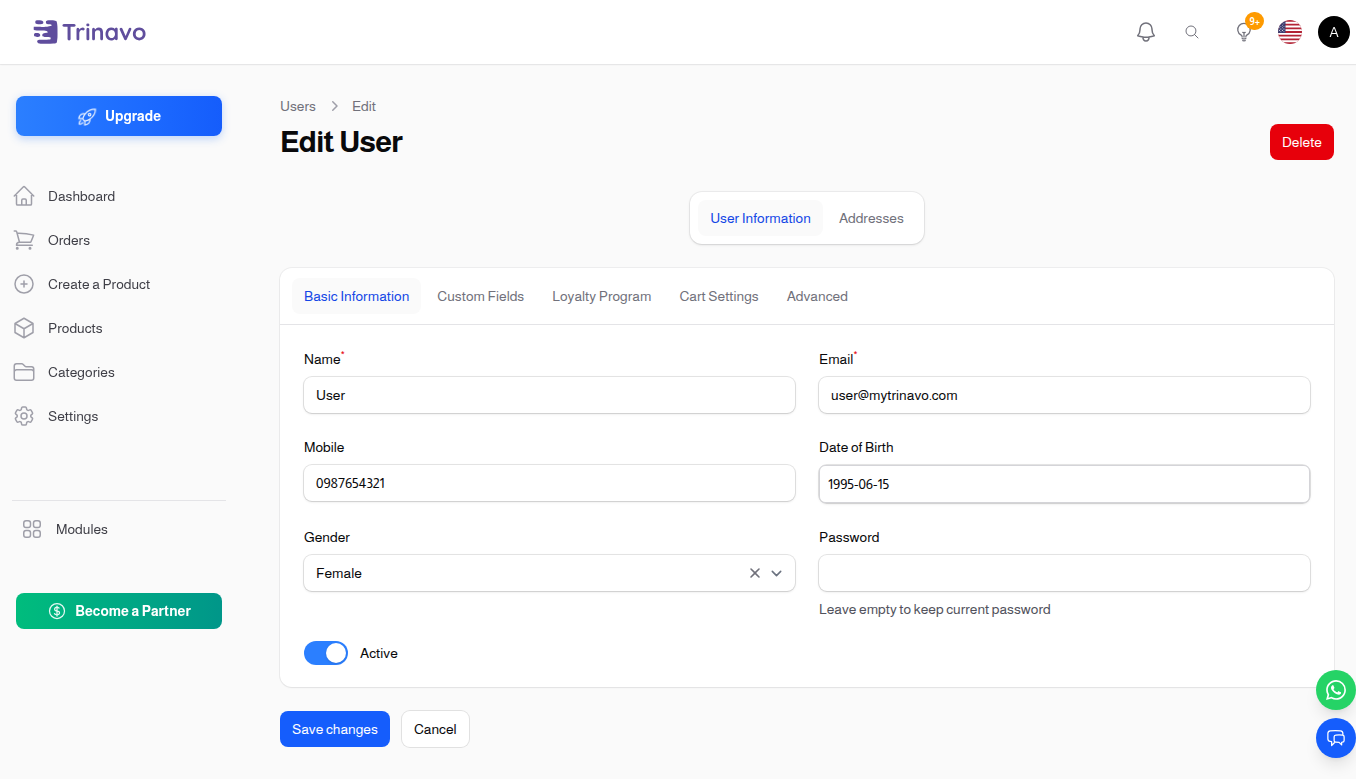
Edit Form Views
When editing an existing user, the same tabs appear with the user's current data pre-filled. The edit views also surface read-only values that are computed from activity.
Edit — User Info
Edit — Custom Fields
Edit — Loyalty
Edit — Cart Settings
Edit — Advanced
Managing Addresses
When editing a user, you can manage their addresses in the Addresses tab.
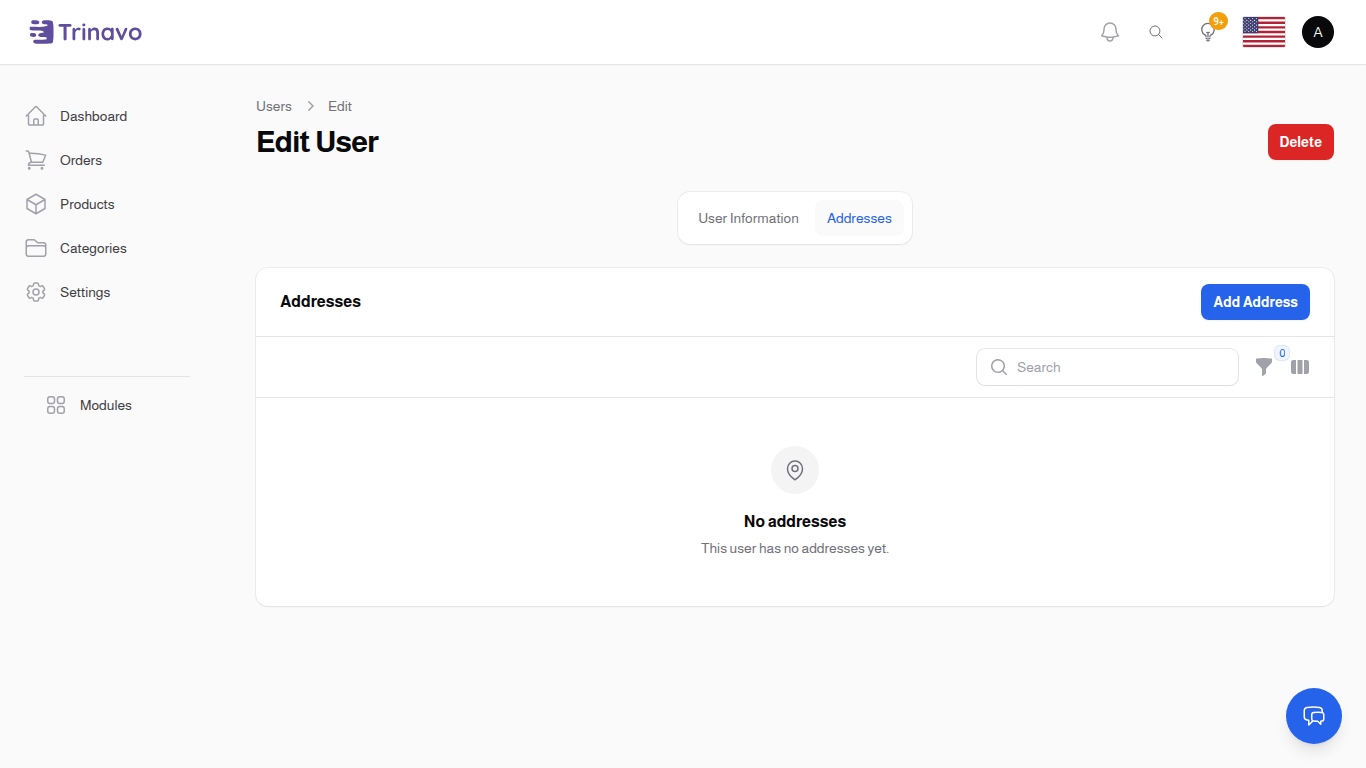
Each address includes:
- Title (e.g., Home, Work, Office)
- First Name and Last Name
- Company (optional)
- Phone number
- Address lines
- Street Name, Building Number, Floor Number
- Country, State/Province, City
- Postal Code
- Default Address toggle
- Billing Address toggle
- Shipping Address toggle
Assigned Categories
When editing a vendor or admin user, you will see an Assigned Categories section at the bottom of the edit page. This allows you to restrict which categories the user can access.
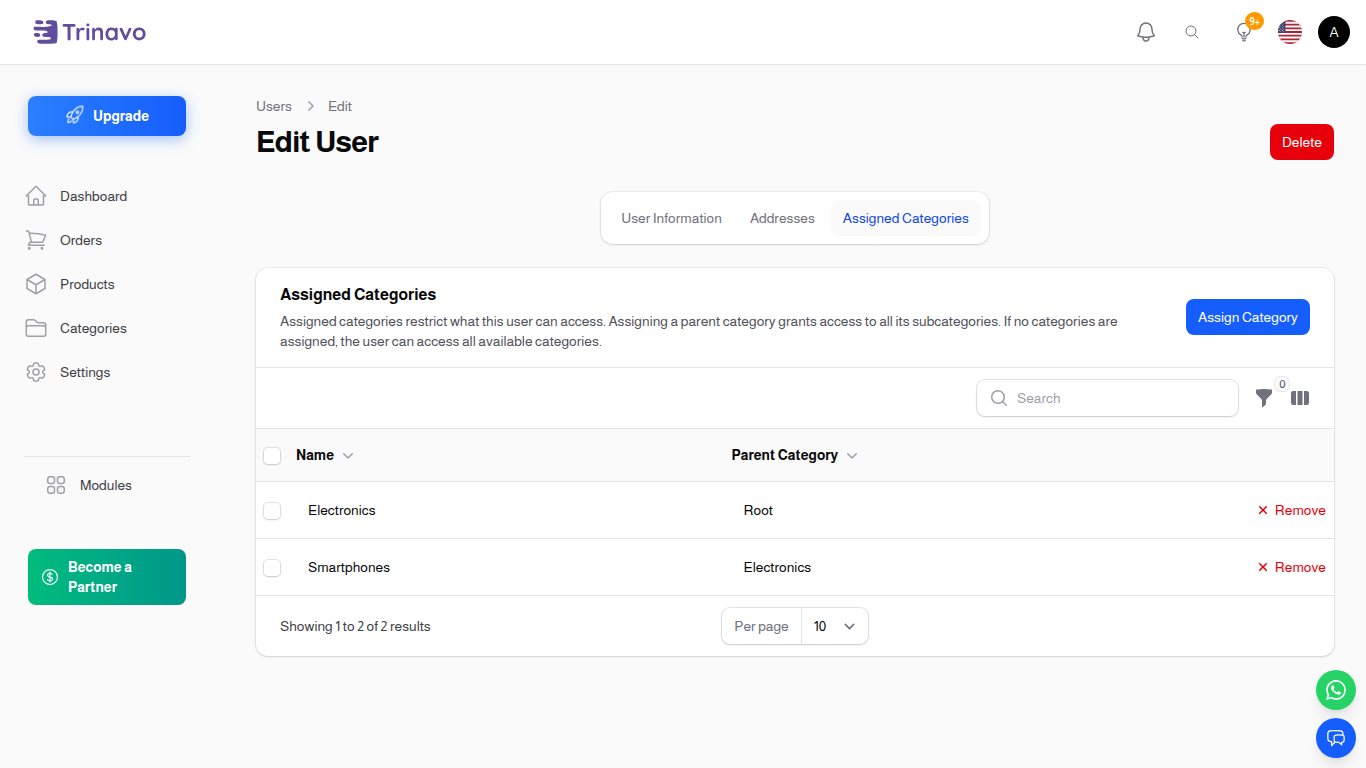
The Assigned Categories tab showing categories assigned to a user
Who sees this section?
The Assigned Categories section appears for users who are:
- Vendors — restricts which categories they can create products in
- Admins (users with
access_admin_panelpermission) — restricts which items and orders they can see
It does not appear for Super Admins (they always have full access) or regular customers.
Assigning Categories
- Edit the user
- Scroll to the Assigned Categories section
- Click Assign Category
- Select one or more categories
- Assigning a parent category automatically includes all its subcategories
Removing Categories
- Click Remove next to the category
- Confirm the action
For vendors: removing a category assignment will disable all their products in that category and its subcategories.
For admins: removing a category has no effect on products — it only changes what orders and items they can see.
No Categories Assigned
- Vendors with no assignments can access all categories marked as "Available for Vendors"
- Admins with no assignments can see all items and orders (no restriction)
For more details, see Admin Category Restrictions.
Row Actions
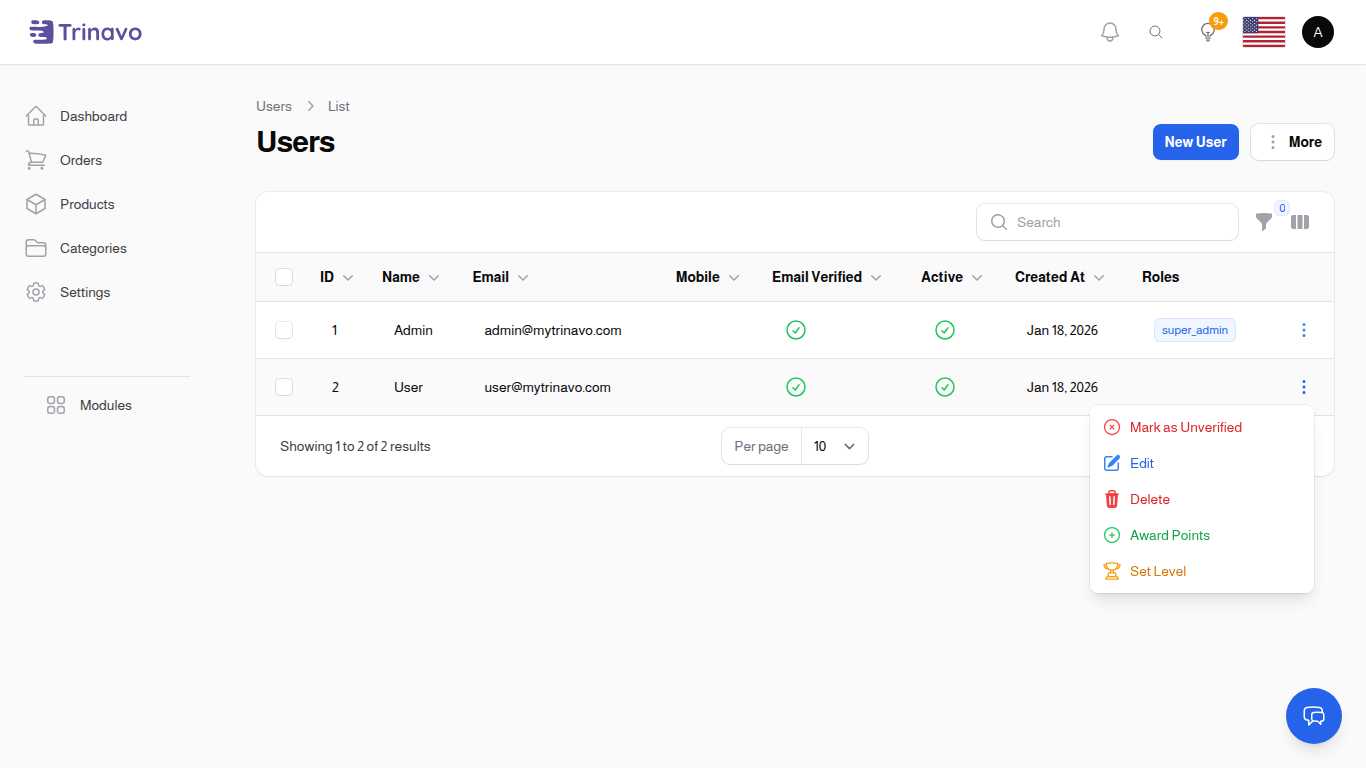
Click the actions menu (⋮) on any user row to access:
- Mark as Verified/Unverified: Toggle email verification status
- Edit: Open user edit form
- Delete: Remove user account
- Award Points: Add loyalty points to user
- Deduct Points: Remove loyalty points (if user has points)
- Set Level: Manually assign a loyalty level
- Reset to Auto: Return to automatic level assignment (if manually set)
Exporting Users
Export user data to Excel or PDF for customer analysis, marketing campaigns, or compliance reporting.
Export All: Click More → Export to download all users.
Export Selected: Select users with checkboxes, then choose Export from bulk actions.
Data Included: Name, email, mobile, roles, status, registration date, wallet balance, loyalty points.
Managing Users
Creating a User
- Click New User
- Fill in the Basic Information tab:
- Enter Name (required)
- Enter Email
- Enter Mobile (optional)
- Select Date of Birth (optional)
- Select Gender (optional)
- Enter Password (required)
- Toggle Active status
- Configure other tabs as needed
- Click Create
Editing User Info
- Click on a user row or the Edit action
- Navigate through tabs to update fields
- Modify Addresses in the Addresses tab
- Click Save changes
Resetting Password
- Edit the user
- In the Basic Information tab, enter a new password
- Leave the password field empty to keep the current password
- Save changes
Deactivating Users
- Edit the user
- Toggle Active to off
- Save
- User loses access immediately
Deleting Users
- Click the actions menu (⋮) on the user row
- Click Delete
- Confirm action
- User account permanently removed
User Search & Filtering
- Search by name, email, or mobile
- Filter by verification status (Verified/Unverified)
- Filter by active status
- Filter by role
- Filter by loyalty level
- Filter by stock holding status
- Sort by any column
Bulk Actions
Select multiple users to:
- Delete multiple accounts
- Mark as Verified: Set email as verified for selected users
- Mark as Unverified: Remove email verification for selected users
- Toggle Active Status: Switch active status for selected users
- Export: Download selected user data
Best Practices
- Secure access: Use strong initial passwords
- Verify email: Ensure email addresses are active
- Regular cleanup: Remove inactive accounts
- Role assignment: Grant minimum necessary permissions
- Monitor activity: Track login patterns
- Backup data: Export user lists regularly
- Use holds stock wisely: Only enable for VIP customers to avoid inventory issues
Common Workflows
Onboard New Customer
- Click New User
- Enter name and email
- Leave Roles empty (customers don't need admin roles)
- Ensure Active is toggled on
- Click Create
- User can login with set password
Add New Staff Member
- Click New User
- Fill in basic information
- Go to Advanced tab
- Assign appropriate role(s)
- Click Create
- Share login credentials securely
Set Up a Restricted Admin
- Click New User
- Fill in basic information
- Go to Advanced tab
- Assign a role with
access_admin_paneland order/item permissions - Click Create
- Edit the user again, scroll to Assigned Categories
- Click Assign Category and select the categories this admin should manage
- The admin will now only see items and orders in those categories
Award Loyalty Points
- Find user in list
- Click actions menu (⋮)
- Click Award Points
- Enter points amount and description
- Confirm
Set VIP Customer Level
- Find user in list
- Click actions menu (⋮)
- Click Set Level
- Select the desired level
- Confirm (this switches to manual mode)
Enable Stock Holding for VIP
- Edit the user
- Go to Cart Settings tab
- Enable Holds Stock
- Optionally set custom cart expiry days
- Save changes
Add Wallet Balance
The user's row actions menu (⋮) includes a quick Add Balance shortcut so you don't have to leave the Users page to credit a customer:
- Click the actions menu on the user's row.
- Click Add Balance.
- Pick the wallet currency (the dropdown lists all wallets the user already has — if the user only has one wallet, it's preselected). For new users, the platform automatically creates a wallet in your store's base currency the first time the user logs in or is touched by a wallet operation, so the dropdown is rarely empty.
- Enter the amount and a short description (e.g. "Goodwill credit", "Refund for ticket #123").
- Confirm. The wallet balance updates instantly and a transaction line is recorded in Wallet Transactions.
If the chosen currency wallet doesn't exist yet, it's created on the fly with the entered amount as the opening balance.
View User Wallets / Carts
The same actions menu has shortcuts to:
- Wallets — opens User Wallets pre-filtered to this user.
- View Carts — opens Carts pre-filtered to this user. Useful when troubleshooting a cart that's holding stock.
Both open in a new tab so you don't lose your place in the user list.
Troubleshooting
Q: Can users reset their own passwords? A: Yes, through login page "Forgot Password" link.
Q: What if user forgets both password and email access? A: Only admin can reset via this Users section.
Q: Can I assign multiple roles to one user? A: Yes, select multiple roles in the Advanced tab.
Q: How do I know user status? A: Active column shows a green checkmark for active users.
Q: Can deleted users be recovered? A: No, deletion is permanent unless you have backups.
Q: Why can't I deactivate myself? A: For security, users cannot deactivate or delete their own account.
Q: What happens when I manually set a level? A: The user's level will no longer update automatically based on purchases until you reset to auto mode.
Quick Reference
| Field | Tab | Type | Required | Notes |
|---|---|---|---|---|
| Name | Basic | Text | Yes | User full name |
| Basic | Conditional | Based on system settings | ||
| Mobile | Basic | Phone | No | Contact number |
| Date of Birth | Basic | Date | No | For age verification |
| Gender | Basic | Select | No | Male/Female |
| Password | Basic | Password | Create only | Leave empty to keep current |
| Active | Basic | Toggle | Yes | Account status |
| Custom Fields | Custom Fields | Various | Varies | Dynamic based on configuration |
| Loyalty Points | Loyalty | Display | - | Read-only |
| Current Level | Loyalty | Display | - | Read-only |
| Manually Set Level | Loyalty | Select | No | Override auto level |
| Holds Stock | Cart | Toggle | No | Reserve cart items |
| Cart Expiry Override | Cart | Number | No | Days (1-365) |
| Email Verified | Advanced | Toggle | No | Verification status |
| Telegram Chat ID | Advanced | Text | No | For notifications |
| Roles | Advanced | Multi-select | No | Assign permissions |
Related Configuration
Configure user registration settings in System Settings:
- Require Email - Make email mandatory during registration
- Require Mobile - Make mobile phone mandatory during registration
- Require Email Verification - Force users to verify email before accessing the app
Related Sections
- Roles - Manage user permissions
- User Custom Fields - Add custom user data
- User Levels - Configure loyalty levels
- Loyalty Transactions - View loyalty point history