Item Variations
Item Variations represent different versions of a product based on attribute combinations like color, size, or material. The variation manager automatically generates all possible combinations and lets you set individual prices, quantities, and SKUs for each.
Overview
The Variation Manager allows you to:
- Select attributes that apply to a product (Color, Size, Material, etc.)
- Choose attribute values for each attribute (Red, Blue for Color; S, M, L for Size)
- Auto-generate combinations from selected values (Red-S, Red-M, Blue-S, Blue-M, etc.)
- Set price and quantity for each variation individually or in bulk
- Configure user level pricing for loyalty program tiers
- Upload images by attribute (e.g., different images per color)
- Add new attribute values directly from the manager
Common use cases: - T-shirt in different sizes and colors - Laptop with different RAM/storage configurations - Shoes in different sizes and widths
Accessing the Variation Manager
There are two routes, and both open the same editor:
Fastest (from the products list):
- Navigate to Products
- Click the Variations icon on the product row, which opens the editor in a slide-over panel
From the product page:
- Navigate to Products and click on a product to edit it
- Click the Variations button at the top of the page, next to the language switcher
The button sits directly in the header, not inside the More actions dropdown. Both it and the row icon carry a badge showing how many variations the product currently has.
Step-by-Step Guide
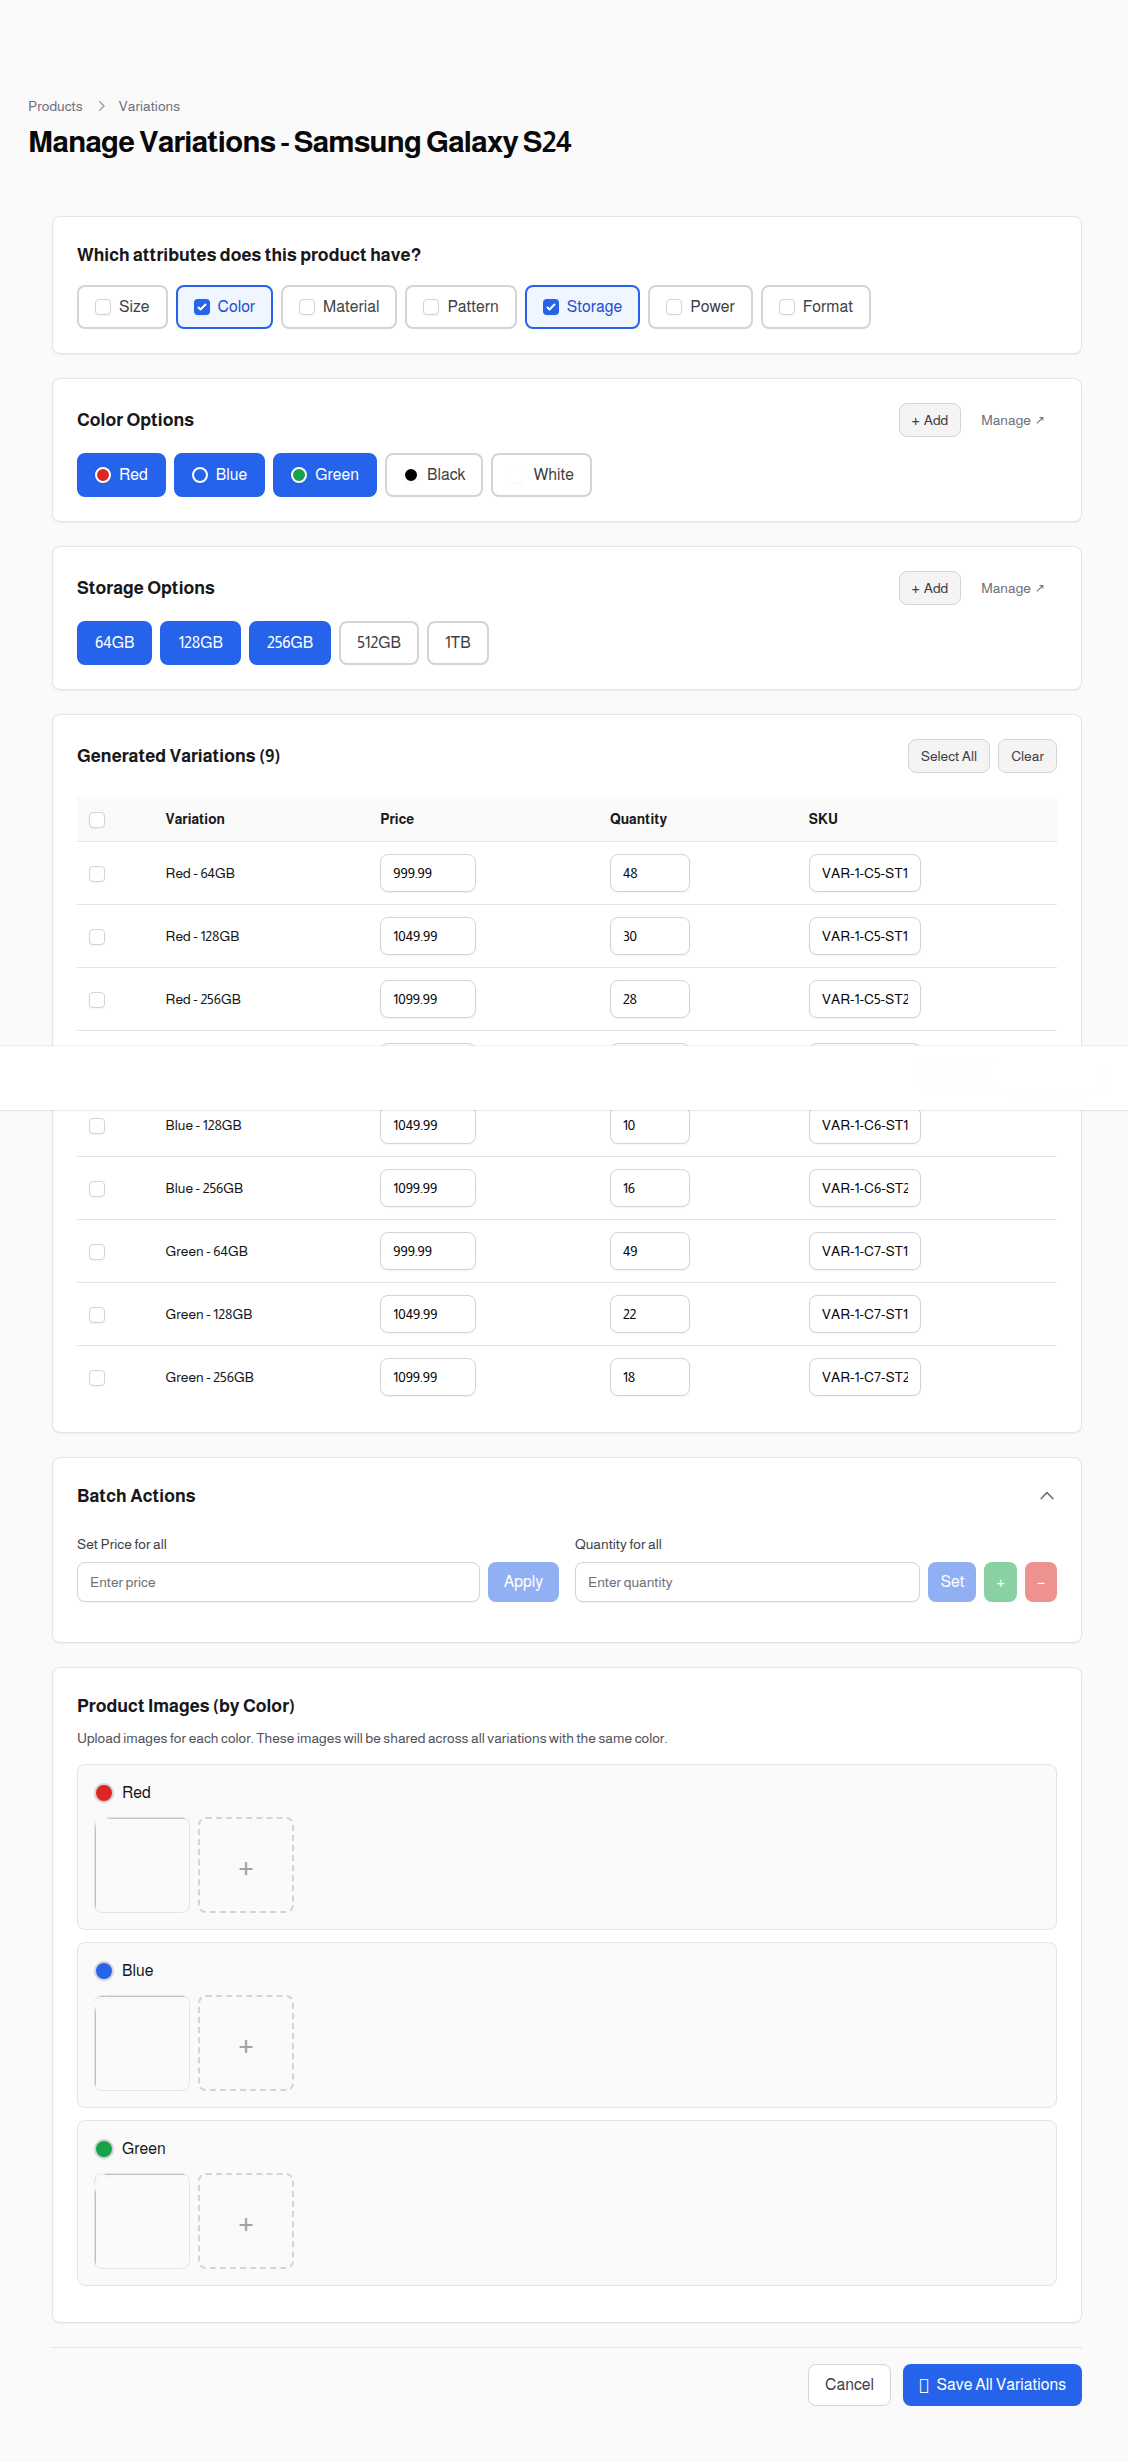
Step 1: Select Attributes
The first section shows all available attributes (defined in Item Attributes).
- Check the attributes that apply to this product
- Selected attributes are highlighted with a colored border
- You can select multiple attributes (e.g., both Color and Size)
Example: For a t-shirt, select both "Color" and "Size" attributes.
Step 2: Choose Attribute Values
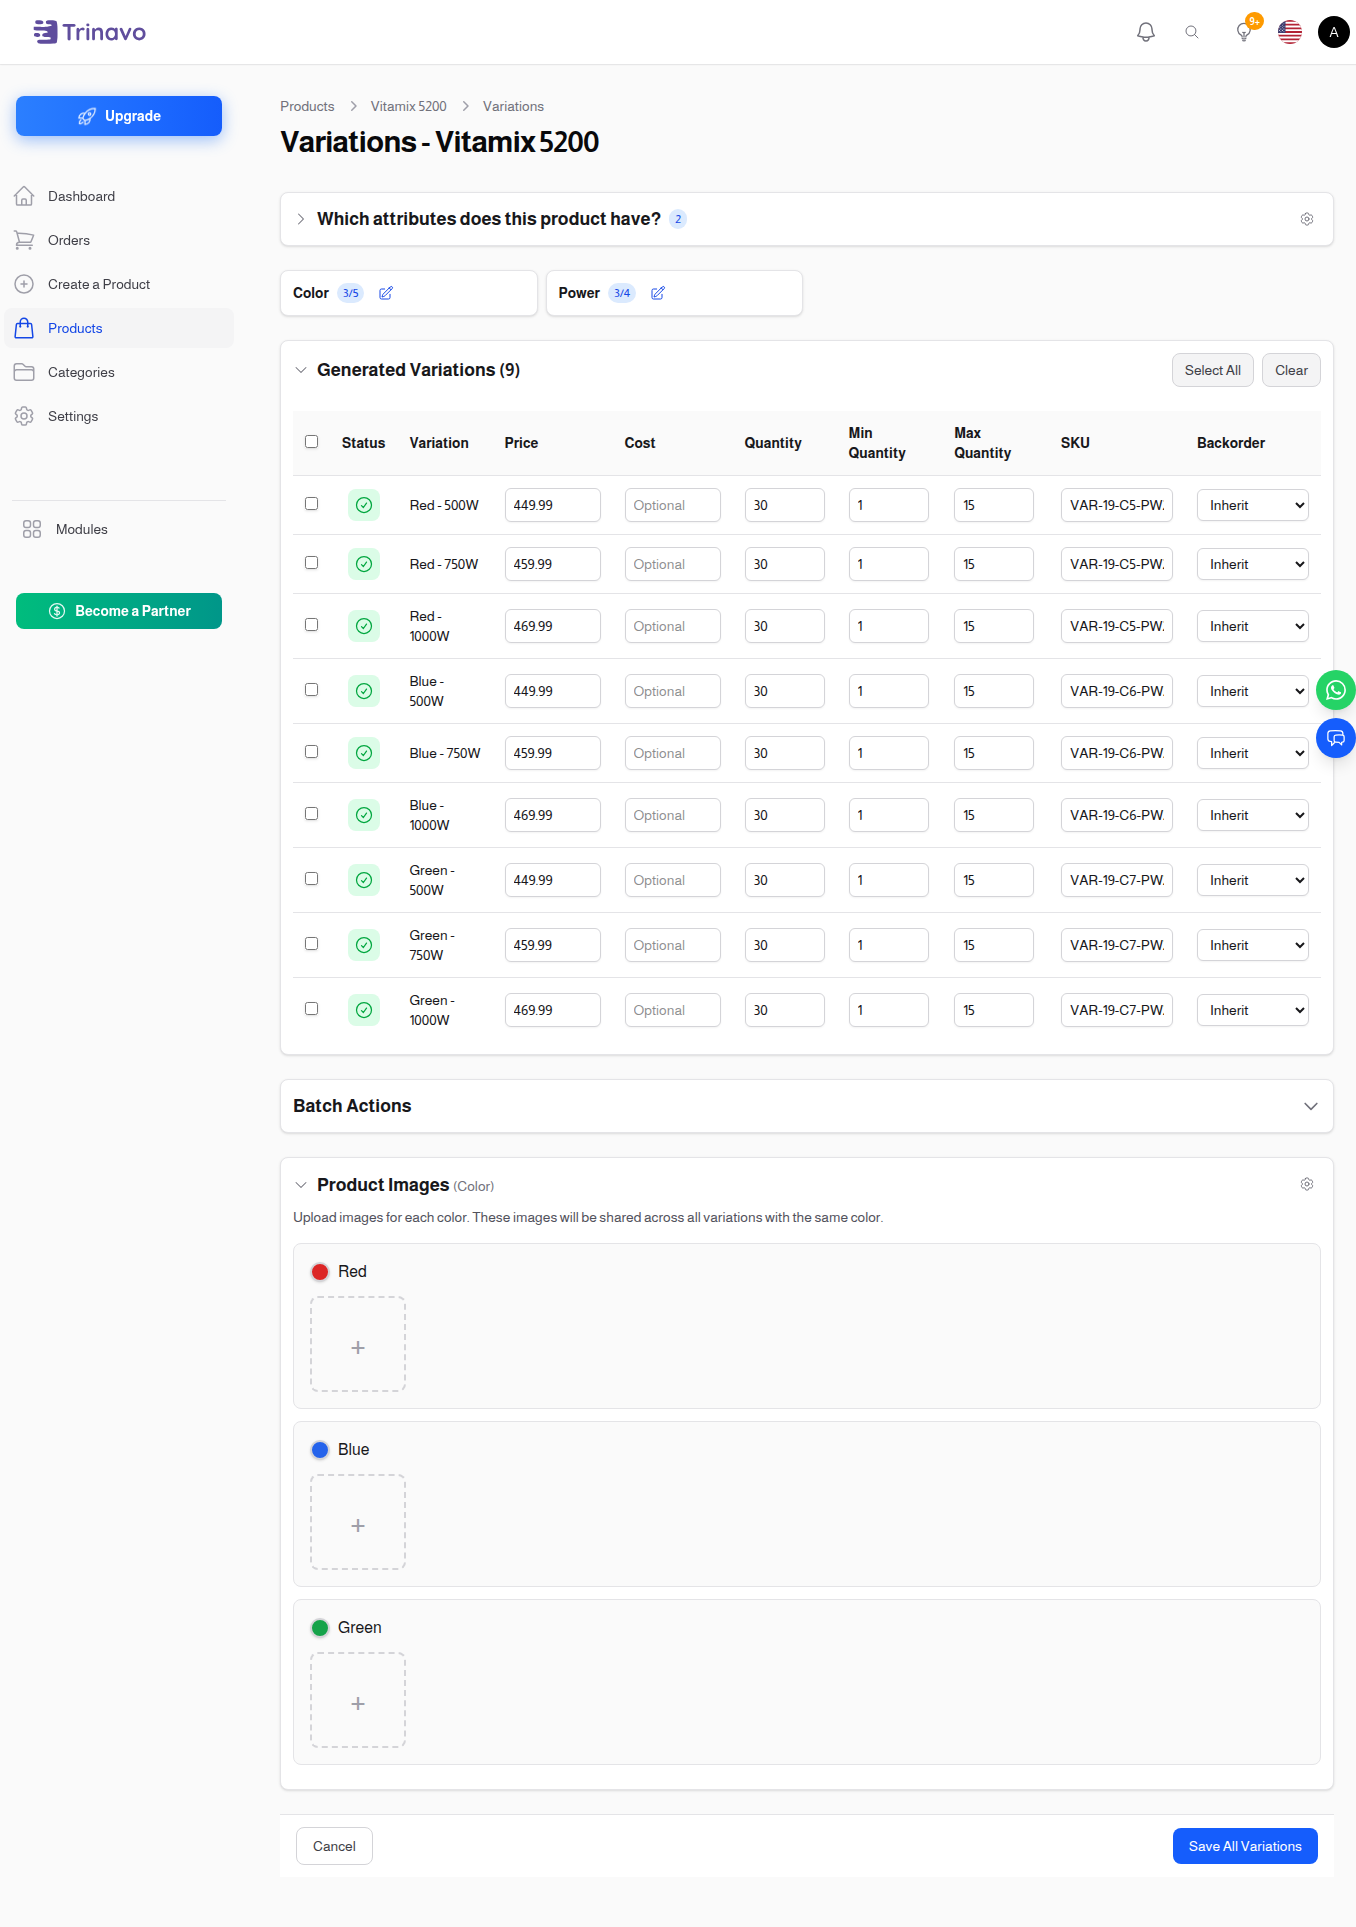
Each selected attribute gets a card showing the attribute name and how many of its values are selected.
- Click the pencil Edit icon on the card to open the values modal
- Select the values you need. Search values..., Select All and Deselect All help with long lists
- To add a value that does not exist yet, click + Add new values, type one value per line, then Add. New values are selected automatically
- Click OK to close the modal
Example: For Color, select "Red", "Blue", "Green". For Size, select "S", "M", "L", "XL".
To create a new attribute
Attributes are not created here. Click the gear Manage icon at the top of the attribute selection section, which opens the Item Attributes page in a new tab.
Step 3: Review Generated Variations
The system automatically generates all possible combinations (cartesian product).
Example: 3 colors × 4 sizes = 12 variations: - Red - S, Red - M, Red - L, Red - XL - Blue - S, Blue - M, Blue - L, Blue - XL - Green - S, Green - M, Green - L, Green - XL
Each variation row shows:
| Column | Description |
|---|---|
| Checkbox | Select for batch operations |
| Variation | Combination name (e.g., "Red - Large") |
| Price | Selling price (optional, inherits from product if empty) |
| Cost | Cost price for profit tracking (optional) |
| Level Prices | Special prices for user levels (if configured) |
| Quantity | Available stock |
| SKU | Stock Keeping Unit (auto-generated if SKU Generator is enabled) |
Step 4: Set Prices and Quantities
You can enter values individually or use batch operations:
Individual Entry: - Click directly in any input field - Enter the value - Move to next field
Batch Operations: 1. Select specific variations using checkboxes (or leave empty for all) 2. Expand the Batch Actions section 3. Enter value and click Apply
Step 5: Upload Images (Optional)
If you have an "image controlling attribute" configured (usually Color):
- A section appears showing each selected value
- Click the + button to upload images
- Images are shared across all variations with that attribute value
Example: Upload red product images once, they apply to Red-S, Red-M, Red-L, etc.
Step 6: Save Variations
Click Save All Variations to create/update all variations at once.
Batch Actions
The Batch Actions panel provides efficient bulk operations:
Price Operations
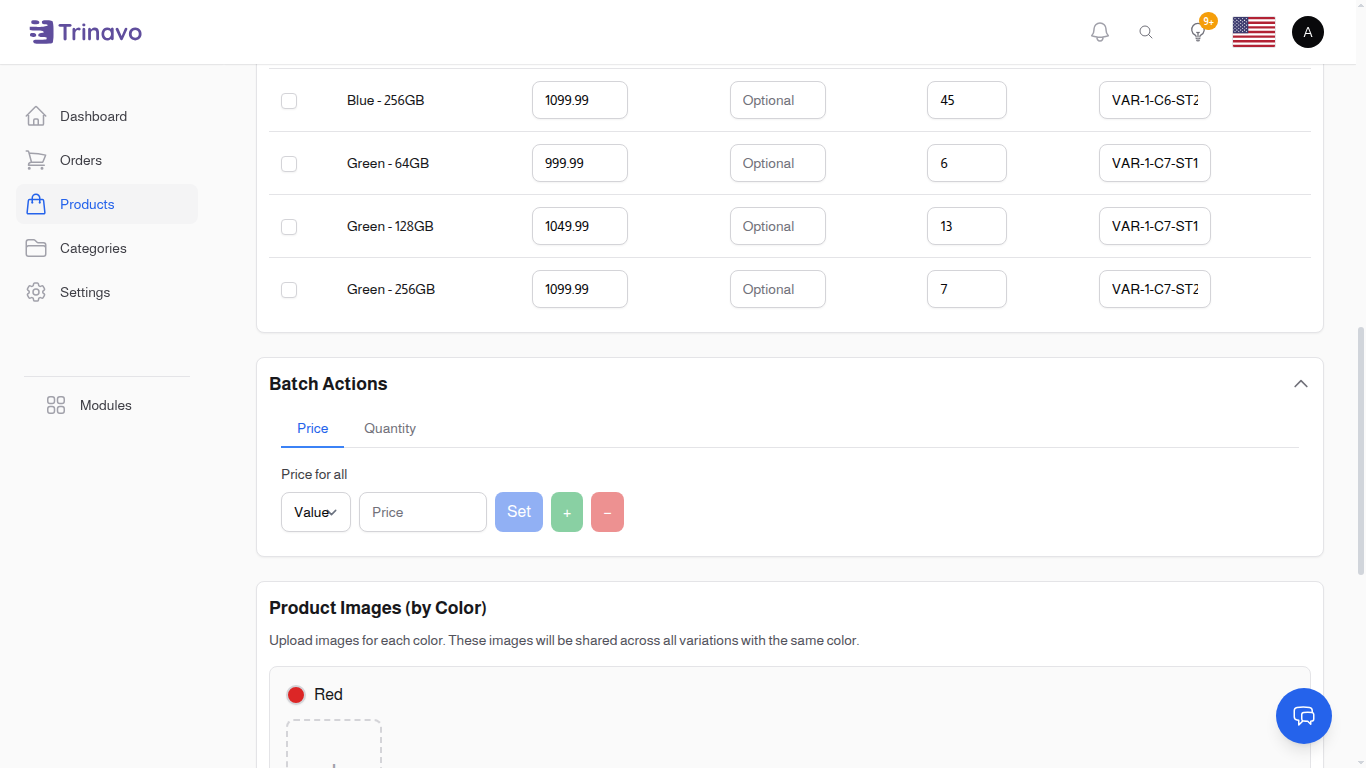
| Action | Button | Description |
|---|---|---|
| Set | Set | Replace price with entered value |
| Add | + | Add to existing price (by value or percent) |
| Decrease | − | Subtract from existing price (by value or percent) |
Mode Options:
- Value: Apply a fixed amount (e.g., add $10)
- Percent: Apply a percentage (e.g., increase by 10%)
Quantity Operations
| Action | Button | Description |
|---|---|---|
| Set | Set | Replace quantity with entered value |
| Add | + | Add to existing quantity |
| Decrease | − | Subtract from existing quantity (minimum 0) |
User Level Pricing
If you have user levels with special pricing enabled:
- Each level appears with its own batch input
- Apply sets the level price for selected variations
- Clear (✕) removes level prices from selected variations
Adding New Attribute Values
You can add new attribute values without leaving the page:
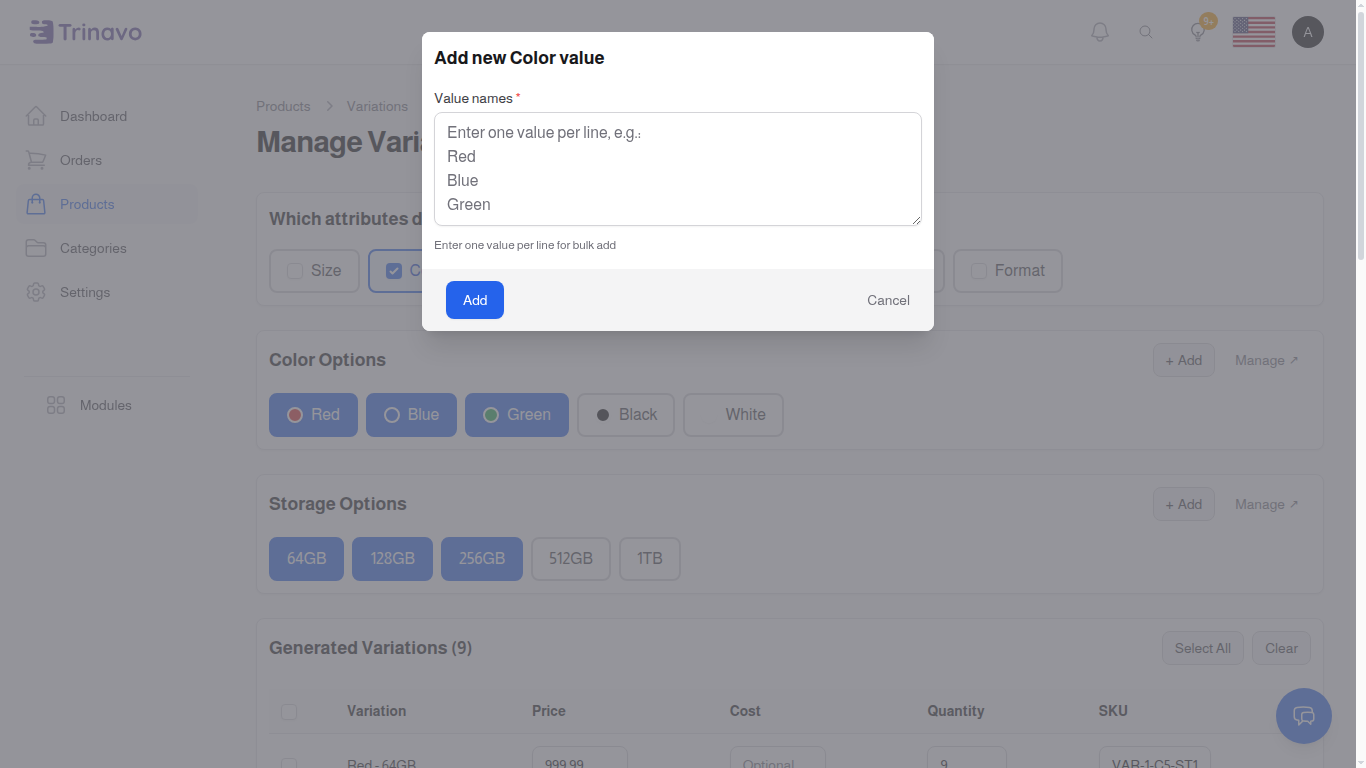
- On the attribute card, click the pencil Edit icon
- Inside the modal, click + Add new values
- Enter one or more value names (one per line for bulk add)
- Click Add
- The new values appear and are auto-selected
Values are shared across all products
A value you add here becomes available to every product in the store, because attributes and their values are not per-product. The color code is set on the Item Attributes page, not in this modal.
Variation Fields Reference
| Field | Type | Required | Description |
|---|---|---|---|
| Price | Number | No | Variation-specific price (uses product price if empty) |
| Cost | Number | No | Cost price for profit calculation (optional) |
| Quantity | Number | No | Available stock (default 0) |
| SKU | Text | No | Unique identifier (auto-generated if enabled) |
| Track Inventory | Boolean | Auto | Enabled when quantity > 0 |
User Level Prices
If your store uses the Loyalty Program with special pricing:
- Columns appear for each user level with special pricing enabled
- Enter level-specific prices for variations
- Leave empty to use the regular variation price
- Use batch operations for efficient bulk updates
Image Management
Images are organized by the "image controlling attribute" (configured in Item Attributes):
How It Works: - Select an attribute as "Controls Images" in Item Attributes settings - Images uploaded for a value apply to all variations with that value - Commonly used with Color attribute
Uploading Images: 1. Click the + button in the attribute value section 2. Select one or multiple images 3. Images appear as thumbnails 4. Hover and click ✕ to remove an image
Workflow Examples
Create T-Shirt Variations
- Edit the T-Shirt product
- Open Variations from the product row (or Actions → Variations)
- Select "Color" and "Size" attributes
- Choose colors: Red, Blue, Black
- Choose sizes: S, M, L, XL
- 12 variations are generated
- Set base price using batch: Enter 29.99, click Apply
- Adjust individual prices if needed (e.g., XL costs more)
- Set quantities: Enter 50, click Set
- Upload color images for each color
- Click Save All Variations
Update Stock After Restock
- Open the product's Variations editor
- Expand Batch Actions
- Enter restock quantity (e.g., 100)
- Click + to add to existing quantities
- Click Save All Variations
Set Premium Pricing for VIP Customers
- Open the product's Variations editor
- Expand Batch Actions
- Find the VIP level price input
- Enter discounted price (e.g., 24.99)
- Click Apply
- Click Save All Variations
Sell Out Specific Variations
- Open the product's Variations editor
- Find the sold-out variation row
- Set quantity to 0
- Click Save All Variations
Best Practices
Attribute Setup
- Create attributes before products (in Item Attributes)
- Use consistent naming (e.g., "Size" not "Sizes")
- Set one attribute as "Controls Images" for visual products
SKU Conventions
If using auto-generation: - Configure SKU Generator settings first - SKUs include attribute codes automatically
If using manual SKUs:
- Pattern: [PRODUCT]-[ATTR1]-[ATTR2]
- Example: SHIRT-RED-L, SHIRT-BLUE-M
Pricing Strategy
- Use batch price for base pricing
- Adjust individual variations for size premiums
- Use user level prices for loyalty discounts
Inventory Management
- Use batch quantity for initial stock
- Use + button for restocks
- Use − button for adjustments
Troubleshooting
Q: Why don't I see any attributes? A: Create attributes first in System Settings → Item Attributes.
Q: Why can't I save variations? A: Select at least one attribute and one value to generate variations.
Q: Where did my old variations go? A: Saving replaces all existing variations. The system recreates them from your current selection.
Q: Why are prices empty after save? A: Empty prices inherit from the parent product. Enter explicit prices if needed.
Q: How do I delete a specific variation? A: Deselect the attribute value that creates it, then save. Or set quantity to 0 to keep it but mark as unavailable.
Q: Images aren't showing for variations? A: Ensure you've set an attribute as "Controls Images" in Item Attributes, and upload images in the variation manager.
Related Sections
- Products - Create base products for variations
- Item Attributes - Define attributes and values
- SKU Generator - Configure automatic SKU generation
- User Levels - Set up loyalty program tiers